
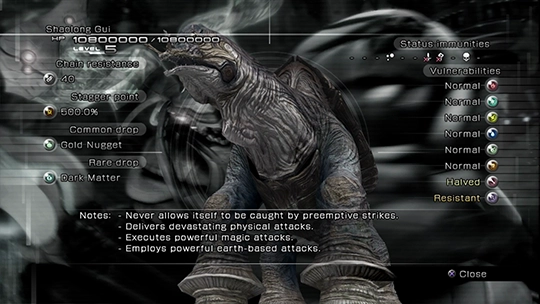
Shaolong Gui
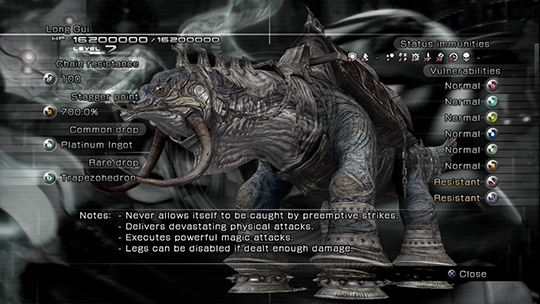
Shaolong Gui is one of the large Oretoises that appear after you have completed all the Missions in the Cie’th Stone Circle. Along with Long Gui and, to a lesser degree, Adamantoise, these are the hardest battles you will face in the game.

It is essentially an upgraded version of an Adamanchelid which previously roamed throughout the Archylte Steppe.
So which one is a Shaolong Gui?
All the Oretoises look very similar, but the differences are noted in the table below, and you may need to open the images and enlarge them to pick up on the subtle differences. While it’s not particularly helpful, you’ll immediately know if you’re facing a Shaolong Gui or a Long Gui because they will use “Quake” or “Ultima” to open the battle.
| Oretoise | Description | |
|---|---|---|
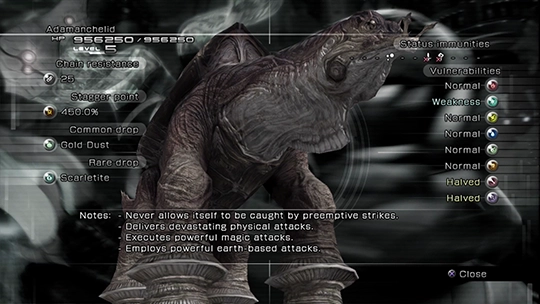
| Adamanchelid | Smallest oretoise, brown, missing both tusks and does not have chains.
|
|
| Adamantortoise | Larger oretoise, brown, has two tusks with one of them broken, also has chains. These disappear from the Archylte Steppe after completing 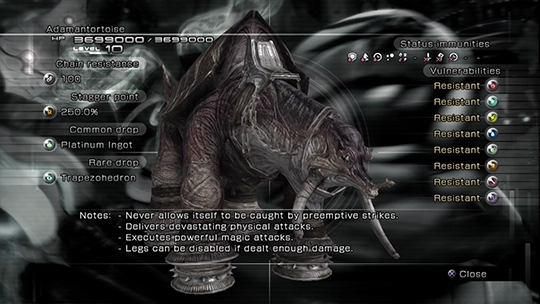
|
|
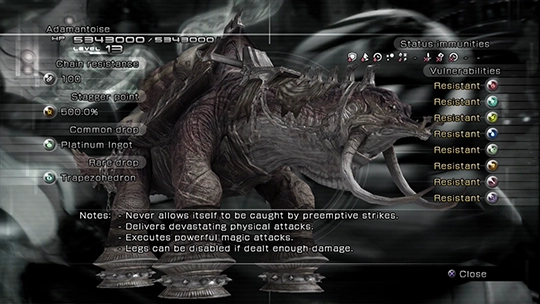
| Adamantoise | Larger oretoise that looks nearly the same as an Adamantortoise. It is light brown, has chains, but the biggest difference to watch for is its unbroken tusks and larger harness.
|
|
| Shaolong Gui | Looks similar to an Adamanchelid (the smallest Oretoise) with no tusks, no chains and no harness, but has a light blue tinted color.
|
|
| Long Gui | Looks similar to an Adamantortoise or Adamantoise (the larger Oretoise) with unbroken tusks, chains and a harness, but has a lightly blue tinted color (barely noticeable in the screenshot).
|
Why challenge one?
Shaolong Gui is not the Oretoise that you need to defeat in order to obtain the Adamant Will Achievement/Trophy, so why should you fight them? There really is no reason other than to attempt the challenge. Alternatively, they do have a 25% chance of dropping a ![]() Gold Nugget and a 5% chance of dropping
Gold Nugget and a 5% chance of dropping ![]() Dark Matter.
Dark Matter.
A more efficient means of obtaining ![]() Dark Matter though is to purchase it from the
Dark Matter though is to purchase it from the ![]() R&D Depot using Gil that you obtain through the Farming Adamantoise method. The strategy for defeating them though is included below for reference.
R&D Depot using Gil that you obtain through the Farming Adamantoise method. The strategy for defeating them though is included below for reference.
Preparation
Your characters should be leveled all the way through their Crystariums and have strong and highly leveled weapons equipped before attempting this fight.
Focus on equipping your characters with leveled up physical and magical resistance gear. This includes ![]() Royal Armlets and
Royal Armlets and ![]() Imperial Armlets ideally leveled up to , which is relatively cheap to do. Additionally, you can help streamline these fights by equipping your characters with a
Imperial Armlets ideally leveled up to , which is relatively cheap to do. Additionally, you can help streamline these fights by equipping your characters with a ![]() Rainbow Anklet which minimizes the chances of Shaolong Gui’s “Bay” attack causing the
Rainbow Anklet which minimizes the chances of Shaolong Gui’s “Bay” attack causing the ![]() Daze effect.
Daze effect.
Boss Battle
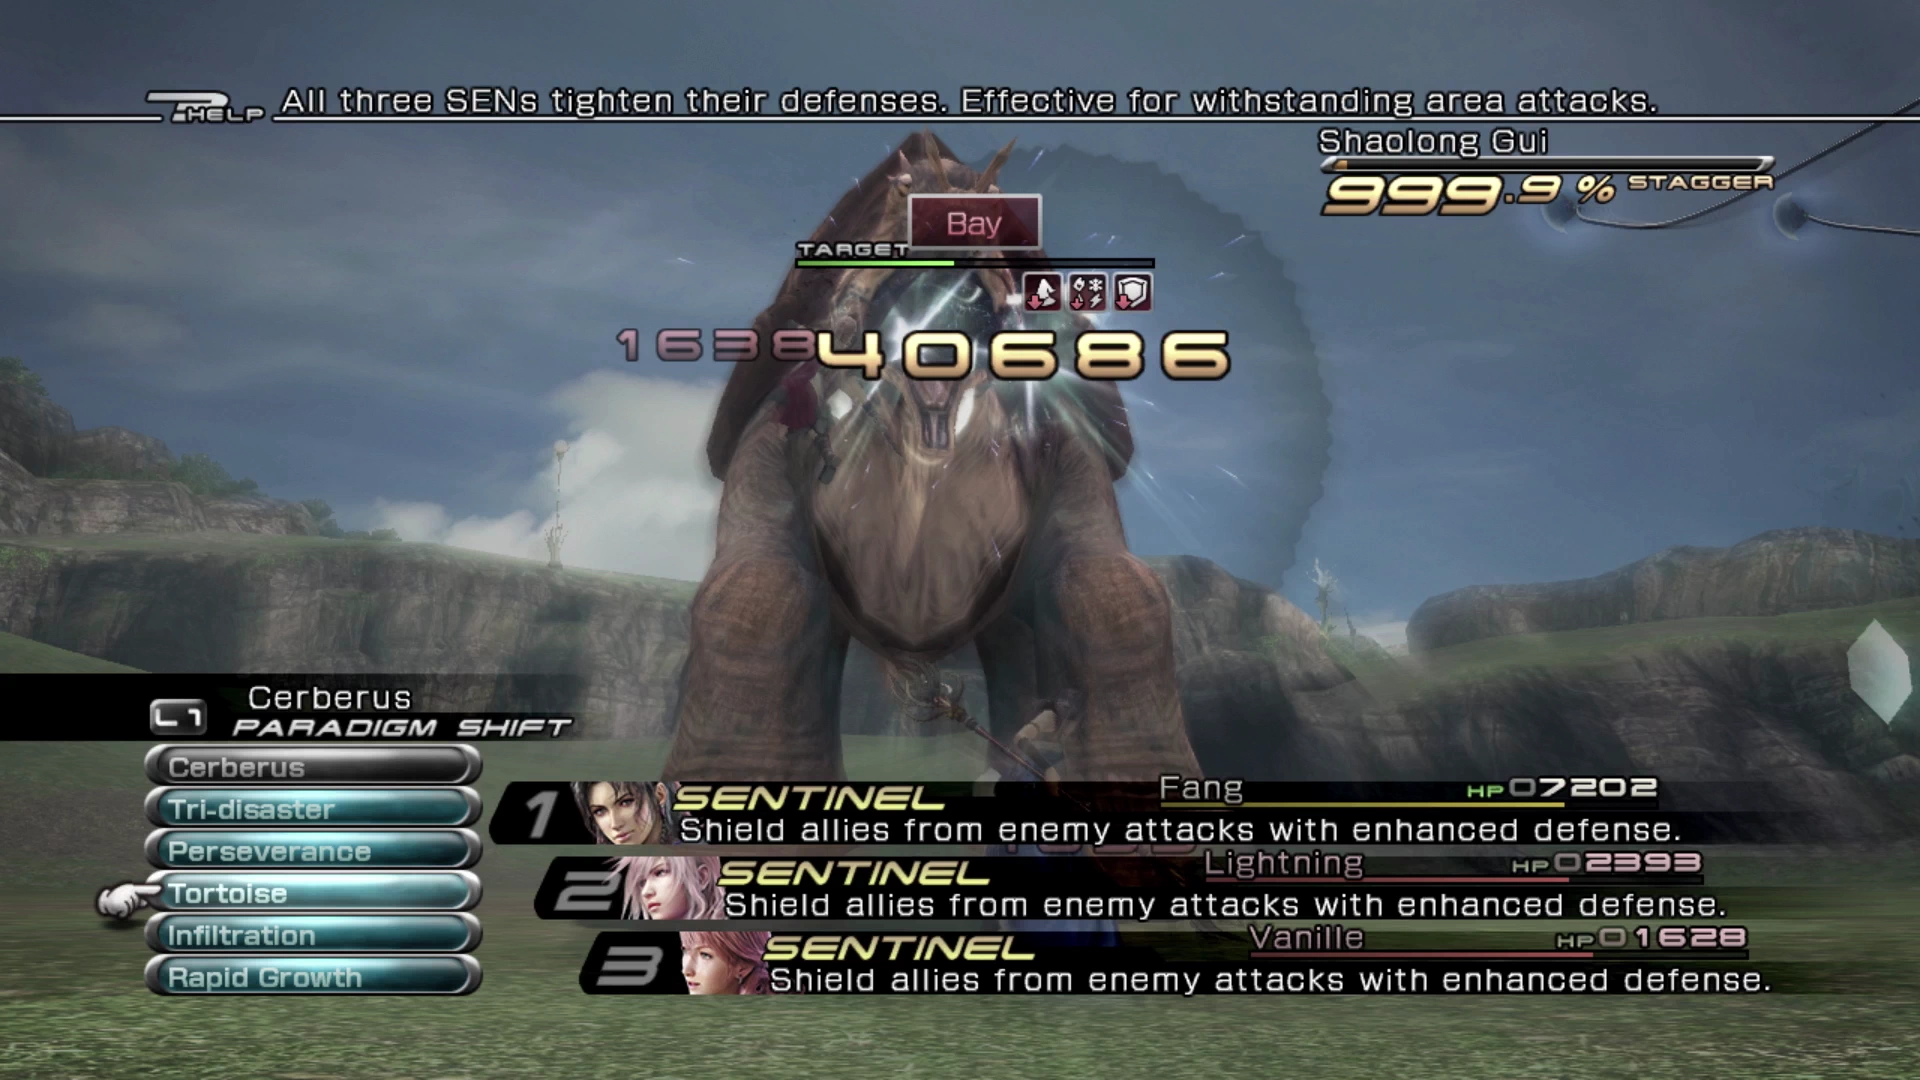
Shaolong Gui has two major weaknesses that you can exploit. Firstly, compared to Adamantoise and Long Gui, it takes far less damage to bring one down. Shaolong Gui has approximately 10,800,000 HP which is more than an Adamantoise, but you don’t have to deal with the two legs first to get it Staggered.
Its second major weakness is the fact that it is susceptible to ![]() Daze itself. This is similar to the battle against Gigantuar for Mission 54 and it can be exploited to interrupt the flow of attacks from Shaolong Gui and give your team time to buff up and prepare.
Daze itself. This is similar to the battle against Gigantuar for Mission 54 and it can be exploited to interrupt the flow of attacks from Shaolong Gui and give your team time to buff up and prepare.
Shaolong Gui has the following attacks:
| Attack | Description |
|---|---|
| Stomp | A regular physical attack where Shaolong Gui will stomp the ground and cause physical damage to all party members. This attack will also interrupt any actions your team members are performing, so keep an eye on status buffs that you queue up when your party members are Synergists because they may be interrupted and will need to be recast. |
| Quake | An earth-based magic attack that hits all targets. This is a fairly powerful attack and Shaolong Gui will use it as soon as the battle begins. |
| Ultima | Shaolong Gui’s most powerful attack. It hits for a lot of damage, but there is a short gap of time between when it uses the move and when the damage hits, allowing you to Paradigm shift if you’re quick. Note that if you see the words “Ultima” on the screen, and then manage to inflict |
| Bay | This move does a fairly high amount of damage, but even worse than the damage is the fact that it can remove multiple buffs from your team members that will need recast. Even worse than that is that it has the potential to |
| Doom | This fight should not take 20 minutes, but Shaolong Gui will cast |
As noted above, Shaolong Gui’s weakness to ![]() Daze is something we’re going to exploit. Set up the following Paradigms with Fang as your party leader and Lightning and Vanille in your team:
Daze is something we’re going to exploit. Set up the following Paradigms with Fang as your party leader and Lightning and Vanille in your team:
And set your default Paradigm to Tortoise. This will allow you to mitigate as much of the opening Quake attack as possible. Then, swap to your Perseverance Paradigm which will allow your two party members to heal up the team while you manually select Fang’s ![]() Daze attack as a
Daze attack as a ![]() Saboteur. This can take a few turns for the
Saboteur. This can take a few turns for the ![]() Daze status to take effect, but once it does, we can get to work on the rest of the strategy. Just remember that you can always use this Paradigm to set up
Daze status to take effect, but once it does, we can get to work on the rest of the strategy. Just remember that you can always use this Paradigm to set up ![]() Daze to stop Shaolong Gui and recover your team’s HP and buffs.
Daze to stop Shaolong Gui and recover your team’s HP and buffs.
Switch to the Rapid Growth Paradigm and your party members will start casting status enhancements. Don’t forget to use ![]() Libra or a
Libra or a ![]() Librascope on the enemy during this downtime if this is your first time fighting a Shaolong Gui. As Fang, manually select
Librascope on the enemy during this downtime if this is your first time fighting a Shaolong Gui. As Fang, manually select ![]() Faithra and
Faithra and ![]() Bravera and cast it on all three party members (which will sometimes override
Bravera and cast it on all three party members (which will sometimes override ![]() Faith or
Faith or ![]() Bravery).
Bravery).
Note: Sometimes Lightning will case ![]() Enfire on team members, which is really helpful, but she’s very inconsistent about this. Don’t wait for her to cast it as you could be waiting around for a while.
Enfire on team members, which is really helpful, but she’s very inconsistent about this. Don’t wait for her to cast it as you could be waiting around for a while.
Next, switch to the Infiltration Paradigm and all three party members can start throwing debuffs at Shaolong Gui. The goal is to get ![]() Deprotect,
Deprotect, ![]() Deshell and
Deshell and ![]() Imperil active.
Imperil active. ![]() Slow is also very nice to have so consider manually selecting Slow as Fang while Lightning and Vanille take care of the other three debuffs. This needs to happen quickly as
Slow is also very nice to have so consider manually selecting Slow as Fang while Lightning and Vanille take care of the other three debuffs. This needs to happen quickly as ![]() Daze will be removed as soon as the attacks start.
Daze will be removed as soon as the attacks start.
From here, it’s a matter of juggling between Tri-disaster to get to Stagger and then Cerberus once Shaolong Gui is Staggered. One more suggestion though is to continue to use Tri-disaster until the Chain Gauge is around 800% in order to get maximum effectiveness out of your ![]() Commando’s attacks.
Commando’s attacks.
The challenge of this battle is being able to quickly switch back to Tortoise as soon as you see “Ultima” being cast and using Perseverance to keep your party healed up if you need to. Ideally, in order to ward off a “Quake” or “Bay” attack, try not to let your party member’s HP fall below ~60% (depending on what kind of defensive gear they have equipped).
The frustrating part of this fight is that you might just get unlucky. Shaolong Gui may use Ultimate/Bay/Quake back-to-back before you have time to prepare, you may have multiple party members get hit by ![]() Daze, etc. Don’t be afraid to move back to a more defensive stance, go back into Perseverance to have Fang recast her
Daze, etc. Don’t be afraid to move back to a more defensive stance, go back into Perseverance to have Fang recast her ![]() Daze attack, and reset from the beginning if you need to. There’s lots of time to complete this battle!
Daze attack, and reset from the beginning if you need to. There’s lots of time to complete this battle!
The video below provides a demonstration but, as a reminder, you may not get as lucky as this example battle shows. Don’t be afraid to hit “Retry” if things aren’t going well.