
Datalog: Primers: Battle
The guides provided in the game tutorials and Datalog section are fairly basic. You can use the Walkthrough section and the Tips and Tricks section.
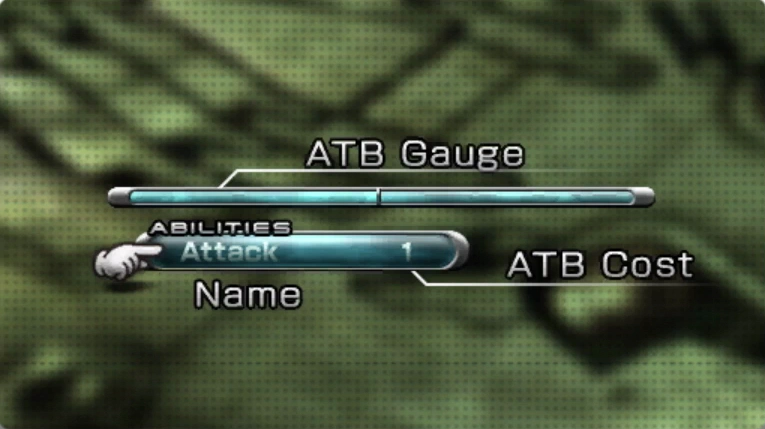
Characters perform abilities in battle by expending segments of the ATB gauge, which charges continuously over time.
Auto-battle and other similar commands queue up a set of abilities automatically, only requiring you to choose a target.
The Abilities command, on the other hand, allows you to specify individual abilities as you see fit. The number to the right of each ability’s name is its ATB cost—the number of charged segments required to perform that action. If you add an ability to the queue by mistake, cancel it with ![]()
![]()
![]() .
.
By pressing ![]()
![]()
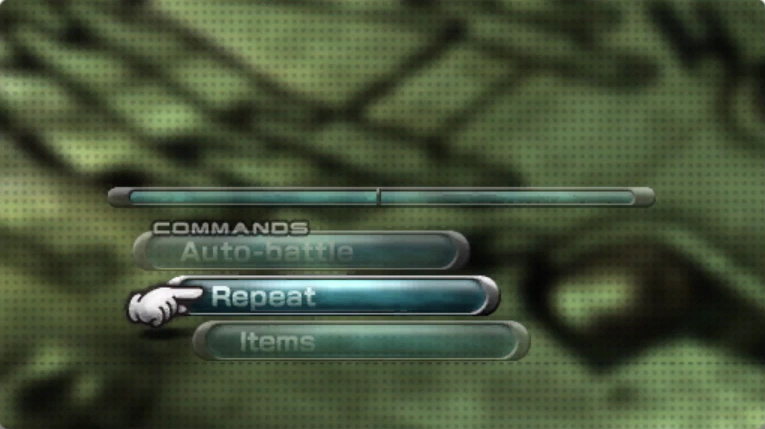
![]() at the Abilities command, you can select Repeat, which queues up the last set of abilities used.
at the Abilities command, you can select Repeat, which queues up the last set of abilities used.
Pressing ![]()
![]()
![]() executes a partial command queue. Queue up a single ability and press
executes a partial command queue. Queue up a single ability and press ![]()
![]()
![]() to execute it immediately, or press
to execute it immediately, or press ![]()
![]()
![]() after entering a full queue to act before your ATB gauge has filled. Abilities corresponding to charged segments will be performed, and the rest will be canceled.
after entering a full queue to act before your ATB gauge has filled. Abilities corresponding to charged segments will be performed, and the rest will be canceled.
Item use does not deplete the ATB gauge but permanent consumes the item.
If the battle team leader’s HP reaches zero, the game is over—regardless of whether other members are still standing. Always keep a close eye on your leader’s HP.
Once you have entered a battle, there is no way to flee. Appraise enemies carefully beforehand. If they appear too powerful, it may be best to avoid the fight entirely.
You can, however, press ![]()
![]()
![]() after pausing a battle with
after pausing a battle with ![]()
![]()
![]() to select Retry, which will return you to a moment just before the battle. Items will be returned, but all damage to enemies will be reset.
to select Retry, which will return you to a moment just before the battle. Items will be returned, but all damage to enemies will be reset.

The speed with which you complete a battle determines your rating. Rating influence rewards, such as the spoils obtained after battle.
For each second you undercut the target time, your score increases by the battle’s PPS (Points Per Second) value. This score, in turn, determines your rating. Finishing at the target time will earn you an average rating of three stars, out of a maximum of five.
Initiative combat with a preemptive strike provides an initiative bonus, pre-applied as an extension of the target time.
Open the main menu by pressing ![]()
![]()
![]() and then select Equipment, and you will see a list passive abilities along the right side of the screen. These are bonuses granted by equipped weapons and accessories.
and then select Equipment, and you will see a list passive abilities along the right side of the screen. These are bonuses granted by equipped weapons and accessories.
Certain combinations of equipment grant additional hidden bonuses that none of the items provide when equipped individually. These are known as synthesized abilities, and are identifiable by a special icon (![]() ).
).
Experiment with a variety of gear to discover which combinations produce the most beneficial results.
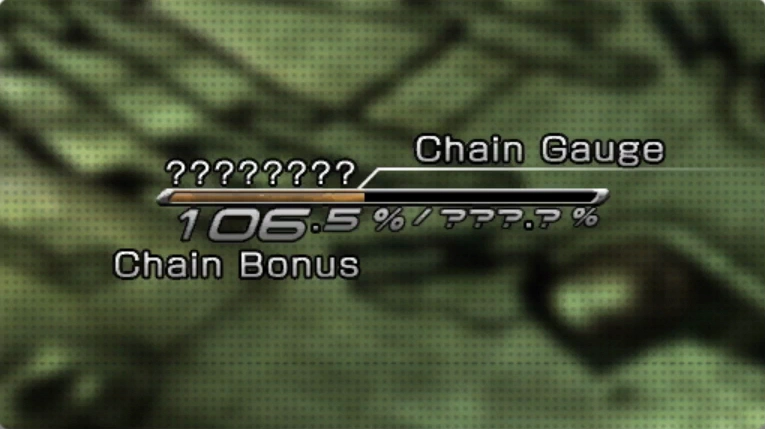
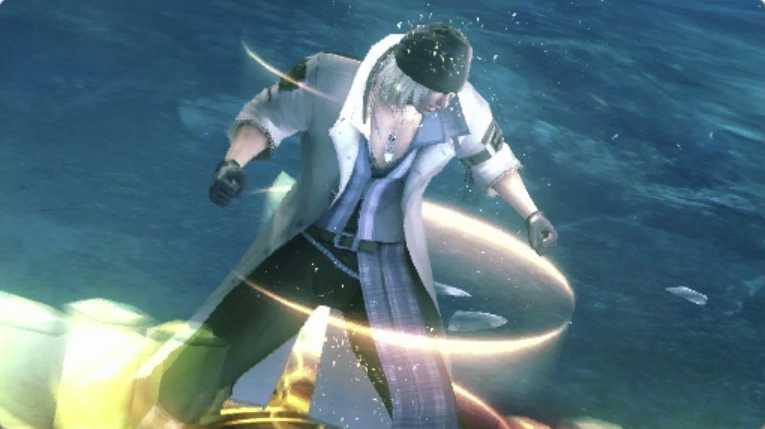
Each time you land a successful attack on an enemy, the enemy’s chain gauge—displayed in the upper right corner of the screen—will charge slightly. This gauge drains slowly over time, but by maintaining a steady flow of attacks you can drive the chain bonus (the percentage of damage dealt by each attack) upward.
Deliver enough hits in rapid succession, and the gauge will eventually fill. If you connect once more with an enemy in this state, you will stagger that enemy. Staggered enemies take a great deal of damage from every attack.
Increased damage is not the only effect of staggering a foe. Some abilities behave differently against staggered targets.
Note that some enemies are more easily staggered than others. The chain gauge for easily staggered opponents will charge significantly even as the result of a minor attack.
It is always to your advantage to stagger enemies quickly, so keep a close eye on their chain gauges and try to maintain a high rate of attacks in order to keep chain bonuses as high as possible.
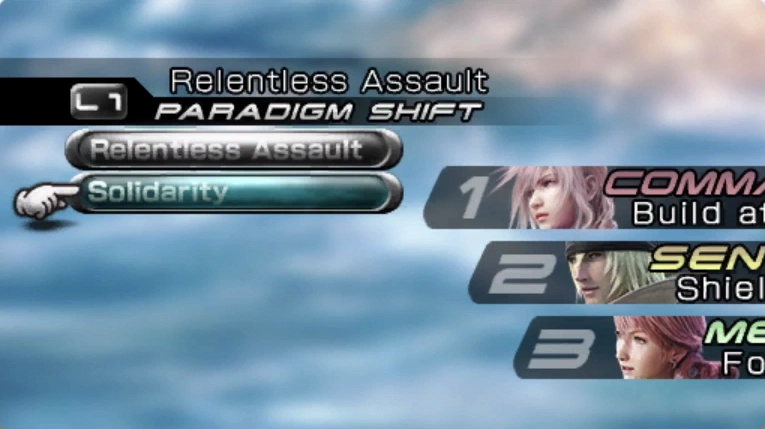
Each character fights using one of six different roles. Changing a character’s Role changes his or her abilities, and also the way in which that character behaves during combat.
Combinations of Role assignments for your battle team are known as paradigms. You can create and edit paradigms by pressing ![]()
![]()
![]() to open the main menu, and then Paradigms.
to open the main menu, and then Paradigms.
During battle, you can change the team’s paradigm at any time. Press ![]()
![]()
![]() to open your paradigm deck, then select a paradigm and press
to open your paradigm deck, then select a paradigm and press ![]()
![]()
![]() to perform a paradigm shift.
to perform a paradigm shift.
Good combat strategy means keeping a careful eye on your situation and shifting paradigm accordingly. When facing strong enemies, use a paradigm featuring a ![]() Sentinel. Once you’ve thinned their numbers a bit, shift to a paradigm featuring
Sentinel. Once you’ve thinned their numbers a bit, shift to a paradigm featuring ![]() Commandos or
Commandos or ![]() Ravagers to finish them off more quickly. When things look grim, call in the
Ravagers to finish them off more quickly. When things look grim, call in the ![]() Medics.
Medics.
![]() Commandos are offensive specialists, employing brutal physical attacks and damaging magic as the tools of their trade. Enemy chain gauges drain less rapidly when charged by Commando attacks than when charged by those of other roles.
Commandos are offensive specialists, employing brutal physical attacks and damaging magic as the tools of their trade. Enemy chain gauges drain less rapidly when charged by Commando attacks than when charged by those of other roles.
Commandos are at their most effective when working in tandem with ![]() Ravagers, who drive chain bonuses upward, thereby increasing the damage dealt to enemies.
Ravagers, who drive chain bonuses upward, thereby increasing the damage dealt to enemies.
Role Bonus: Augmented Attacks
Physical and magical attacks deal extra damage. Allies share a reduced bonus.
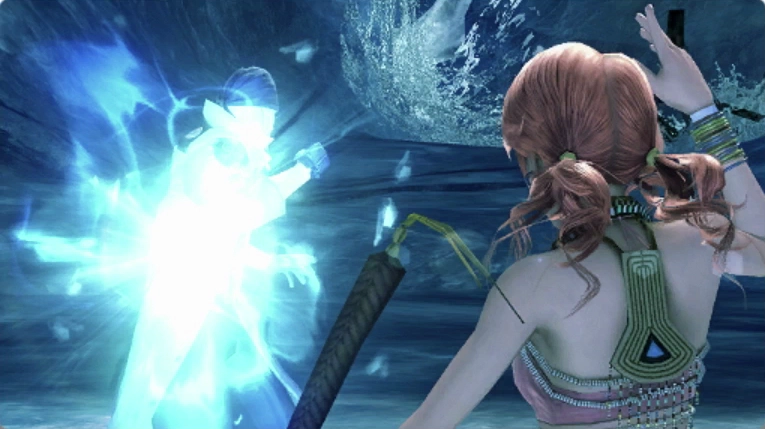
![]() Ravagers wield powerful magic spells, dealing damage of fire, ice, lightning, water, and other elemental affinities. Combining different abilities allow them to boost enemy chain bonuses significantly, increasing the damage dealt by subsequent attacks. Striking at enemies’ elemental weaknesses will further boost chain bonuses.
Ravagers wield powerful magic spells, dealing damage of fire, ice, lightning, water, and other elemental affinities. Combining different abilities allow them to boost enemy chain bonuses significantly, increasing the damage dealt by subsequent attacks. Striking at enemies’ elemental weaknesses will further boost chain bonuses.
Role Bonus: Improved Chaining
Attacks impact chain bonuses more severely. Allies share a reduced bonus.
![]() Sentinels are defensive specialists. They provide interference, drawing enemy aggression toward themselves and using their enhanced defense to minimize damage to the party. Sentinels have access to the Provoke ability, which extends the duration of enemy chain bonuses. They can also use counterattack abilities, which allow them to retaliate when attacked.
Sentinels are defensive specialists. They provide interference, drawing enemy aggression toward themselves and using their enhanced defense to minimize damage to the party. Sentinels have access to the Provoke ability, which extends the duration of enemy chain bonuses. They can also use counterattack abilities, which allow them to retaliate when attacked.
Role Bonus: Damage Reduction
Physical and magic resistance are increased. Allies share a reduced bonus.
![]() Medics are healers, capable of restoring HP, removing status ailments, and even reviving KO’d allies. When they remove status ailments, the most recently inflicted ailment is always removed first.
Medics are healers, capable of restoring HP, removing status ailments, and even reviving KO’d allies. When they remove status ailments, the most recently inflicted ailment is always removed first.
Medics are incredibly helpful, but they also reduce a battle team’s damage-dealing capacity. If you wish to end battles quickly, it may be necessary to fight without them.
Role Bonus: Augmented Healing
Healing abilities and items restore more HP. Allies share a reduced bonus.
![]() Synergists employ a wide range of abilities to enhance their allies’ effectiveness in combat. Enhancements range from defensive bonuses to increased damage and the ability to deal elemental damage via normal attacks.
Synergists employ a wide range of abilities to enhance their allies’ effectiveness in combat. Enhancements range from defensive bonuses to increased damage and the ability to deal elemental damage via normal attacks.
When facing a particularly powerful enemy, it is a good idea to enter the battle using a paradigm that includes a Synergist. Once enhancement are in place, you can always shift to a different paradigm.
Role Bonus: Extended Enhancements
Abilities grant longer-lasting status enhancements. Allies share a reduced bonus.
![]() Saboteurs use their skills to weaken enemies. Their bag of tricks includes not only attribute-lowering abilities, but also those that inflict status ailments, like Poison. When successful, these abilities increase enemy chain bonuses.
Saboteurs use their skills to weaken enemies. Their bag of tricks includes not only attribute-lowering abilities, but also those that inflict status ailments, like Poison. When successful, these abilities increase enemy chain bonuses.
Even if they fail to inflict status ailments, Saboteur abilities still deal damage. However, once enemies have been weakened sufficiently, it is generally best to shift Saboteurs to other roles.
Role Bonus: Boosted Success Rates
Abilities are more likely to succeed on enemies. Allies share a reduced bonus.
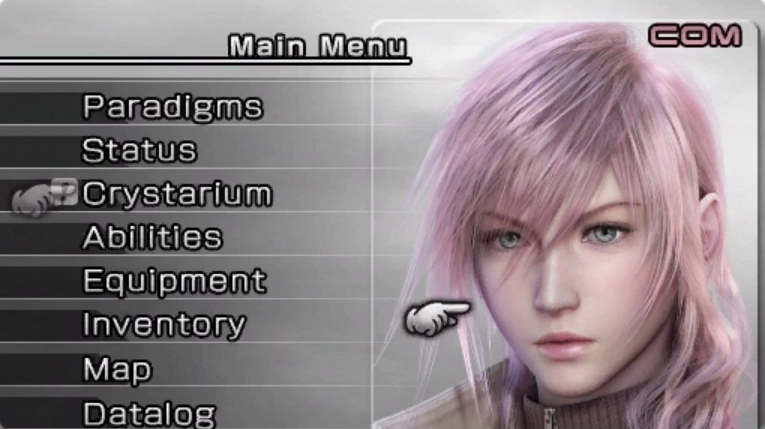
When you wish to develop characters and teach them new abilities, open the main menu with ![]()
![]()
![]() and access the Crystarium.
and access the Crystarium.
By spending the crystogen points (CP) that you earn from fighting, you can advance characters’ paths of crystogenesis, obtaining new crystals that provide a variety of enhancements.
After selecting Crystarium from the main menu, select a character and then press ![]()
![]()
![]() .
.
Character development paths are divided between the different roles.
First, select the Role in which you would like to develop the chosen character and press ![]()
![]()
![]() to confirm. The finger cursor will jump to the last crystal obtained for that role.
to confirm. The finger cursor will jump to the last crystal obtained for that role.
Next, press and hold ![]()
![]()
![]() and the path of crystogenesis will advance automatically consuming the CP necessary to do so.
and the path of crystogenesis will advance automatically consuming the CP necessary to do so.
As the glowing line passes through new crystals, the character will obtain their benefits, such as improved attributes or new abilities. When the character runs out of CP, crystogenesis will grind to a halt.
Characters earn CP at the end of every battle. If you wish to develop them further, fight more enemies, and then return to the Crystarium to spend the CP earned.
Abilities learned along each path are role-specific and cannot be shared. For example, learning ![]() Ruin for the Commando Role will not allow a character to use
Ruin for the Commando Role will not allow a character to use ![]() Ruin as a Ravager. Techniques are the exception to this rule, and can be used in any Role once learned. Boosts to attributes like Strength, Magic, and HP also apply across roles.
Ruin as a Ravager. Techniques are the exception to this rule, and can be used in any Role once learned. Boosts to attributes like Strength, Magic, and HP also apply across roles.
Gaining levels in a Role increases the effect of that Role’s bonus. Consider whether you would rather focus on a single Role for each character, gaining faster access to powerful abilities, or spread development evenly across multiple roles for flexibility.

You can normally perform crystogenesis until running out of CP, simply by pressing and holding ![]()
![]()
![]() . However, the process will stop upon reaching points where the path branches. Here, you must press
. However, the process will stop upon reaching points where the path branches. Here, you must press ![]()
![]()
![]() while holding
while holding ![]()
![]()
![]() to choose a direction in which to proceed.
to choose a direction in which to proceed.
By pressing ![]()
![]()
![]() without holding
without holding ![]()
![]()
![]() , you can explore various routes to see what crystals lie along them.
, you can explore various routes to see what crystals lie along them. ![]()
![]()
![]() changes which crystal names are displayed, cycling between only names near the cursor, all names, and none. Pressing
changes which crystal names are displayed, cycling between only names near the cursor, all names, and none. Pressing ![]()
![]()
![]() and
and ![]()
![]()
![]() will allow you to develop a different character.
will allow you to develop a different character.
Now that all roles have been unlocked, you can assign roles freely to your characters. However, a character must have learned at least one ability for a Role before he or she can don it.
If you wish to cast a character in a new role, first access the Crystarium and teach that character an ability for the desired role.
Master enough roles, and your choice of paradigms will expand significantly.

During the course of battle, the status of enemies and allies can be altered in various ways, some beneficial and some detrimental.
![]() Synergist abilities grant status-enhancing effects that strengthen or protect the recipient.
Synergist abilities grant status-enhancing effects that strengthen or protect the recipient. ![]() Saboteur abilities, on the other hand, inflict troublesome status ailments. Some enemy attacks can also result in these disadvantageous conditions.
Saboteur abilities, on the other hand, inflict troublesome status ailments. Some enemy attacks can also result in these disadvantageous conditions.
It is possible for up to 8 status effects to stack simultaneously. Ignore the harmful ones, and you may soon find your righting capabilities severely limited.
Common status effects include bonuses and penalties to offensive and defensive attributes. These can result from using abilities or even equipping certain pieces of gear.
Changes to Strength and Magic primarily affect the damage characters deal to enemies, with Strength affecting physical attacks and Magic affecting spells. Strength can be boosted with the ![]() Bravery ability, while the
Bravery ability, while the ![]() Faith ability enhances Magic.
Faith ability enhances Magic.
Changes to resistances affect the amount of damage characters take from enemy attacks. Physical resistance can be improved via the ![]() Protect ability, or eroded with
Protect ability, or eroded with ![]() Shell or hampered by
Shell or hampered by ![]() Deshell.
Deshell.
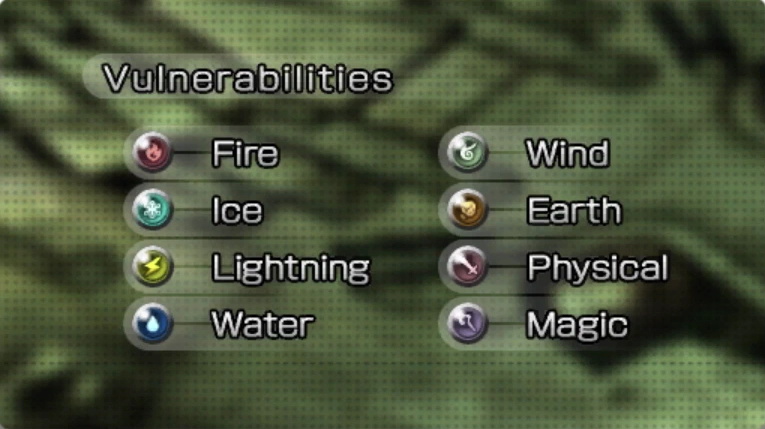
Some enemies are exceptionally vulnerable to certain elements. Attacks that deal damage of the proper type are especially devastating to these opponents.
By using the ![]() Libra technique, you can reveal an enemy’s resistances to the six elements (earth, fire, ice, lightning, water, and wind) as well as to physical and magic damage.
Libra technique, you can reveal an enemy’s resistances to the six elements (earth, fire, ice, lightning, water, and wind) as well as to physical and magic damage.
The ![]() Ravager ole is particularly skilled at elemental attacks, using spells like
Ravager ole is particularly skilled at elemental attacks, using spells like ![]() Fire and
Fire and ![]() Blizzard to deal fire and ice damage respectively.
Blizzard to deal fire and ice damage respectively.
In addition to spells, some physical attacks like ![]() Sparkstrike deal elemental damage (in this case, lightning), while the technique
Sparkstrike deal elemental damage (in this case, lightning), while the technique ![]() Quake inflicts earth damage.
Quake inflicts earth damage.
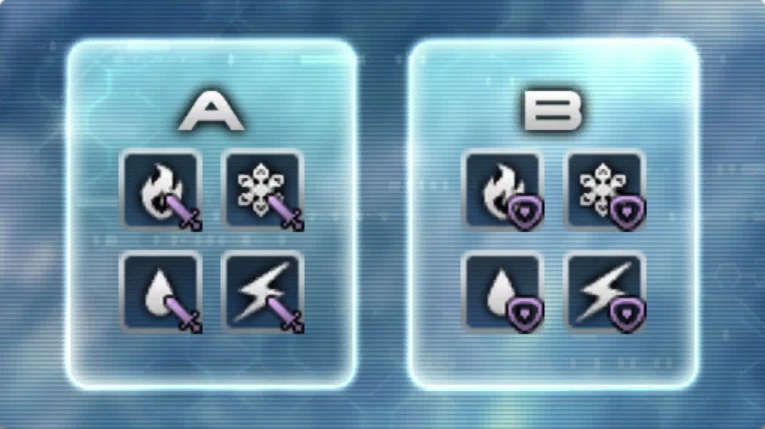
A character need not be a Ravager to deal elemental damage. Affinity-granting abilities like ![]() Enfire cause normal physical attacks to deal damage of the corresponding element. An icon of a sword combined with the imbued element indicates this status.
Enfire cause normal physical attacks to deal damage of the corresponding element. An icon of a sword combined with the imbued element indicates this status.
Enhancements like ![]() Barfire minimize the damage from enemies who employ similar attacks and magic, providing bonuses to elemental resistance. These affects are represented by an icon of a shield combined with the resisted element.
Barfire minimize the damage from enemies who employ similar attacks and magic, providing bonuses to elemental resistance. These affects are represented by an icon of a shield combined with the resisted element.
There are no abilities that grant resistance to, or cause attacks to deal, earth or wind damage. However, there are accessories that do so when equipped.
Physical and magic resistance always take priority over elemental vulnerabilities.
For example, if you attack an enemy who is weak against lightning—but immune to magic—with the ![]() Thunder spell, it will deal no damage. However, attacking the same enemy with
Thunder spell, it will deal no damage. However, attacking the same enemy with ![]() Sparkstrike—a non-magical lightning attacks—will be highly effective.
Sparkstrike—a non-magical lightning attacks—will be highly effective.
Some enemies are immune to both physical and magic damage. If you should happen to encounter such fearsome foes, use ![]() Libra to glean information that might help you overcome them.
Libra to glean information that might help you overcome them.

The debuffing and debilitating status ailments inflicted by some abilities render enemies weak and vulnerable. However, opponents can and will use those very same abilities against you. If you do not take steps to counteract them, you may find yourself fighting at a disadvantage.
Some accessories grant resistance to status ailments, as does the ![]() Veil spell. An icon with an upwards arrow (↑) represents an active resistance bonus. (Z)
Veil spell. An icon with an upwards arrow (↑) represents an active resistance bonus. (Z)
Icons with a downwards arrow (↓) represent detrimental status effects.
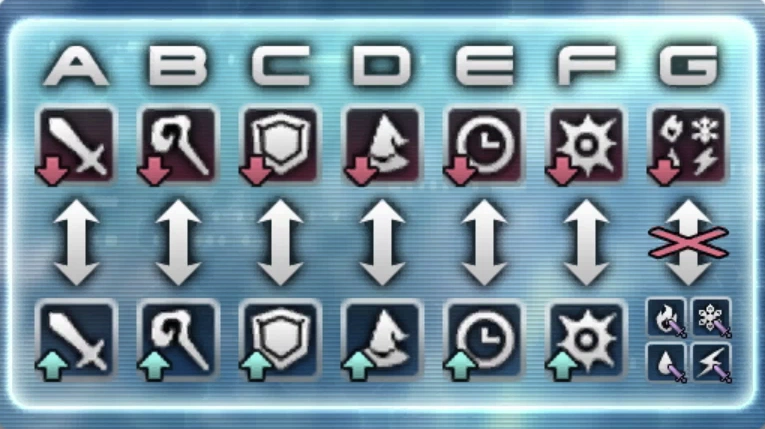
(A) Debrave: Reduces Strength.
(B) Defaith: Reduces Magic.
(C) ![]() Deprotect: Reduces physical resistance.
Deprotect: Reduces physical resistance.
(D) ![]() Deshell: Reduces magic resistance.
Deshell: Reduces magic resistance.
(E) ![]() Slow: Reduces ATB gauge rate.
Slow: Reduces ATB gauge rate.
(F) ![]() Imperil: Reduces elemental resistance.
Imperil: Reduces elemental resistance.

Items remove some status ailments:
(A) ![]() Poison: Deals damage repeatedly over time. Removed by
Poison: Deals damage repeatedly over time. Removed by ![]() Antidote.
Antidote.
(B) ![]() Pain: Prevents use of physical abilities. Removed by
Pain: Prevents use of physical abilities. Removed by ![]() Painkiller.
Painkiller.
(C) ![]() Fog: Prevents spell casting. Removed by
Fog: Prevents spell casting. Removed by ![]() Mallet.
Mallet.
(D) ![]() Daze: Prevents all actions and increases damage. Removed by
Daze: Prevents all actions and increases damage. Removed by ![]() Foul Liquid.
Foul Liquid.
(E) ![]() Curse: Causes own abilities to fail often, while rendering opponents’ likely to succeed. Removed by
Curse: Causes own abilities to fail often, while rendering opponents’ likely to succeed. Removed by ![]() Holy Water.
Holy Water.
The ![]() Esuna spell can also remove status ailments. This ability removes only the most recently inflicted ailment, so it must be used repeatedly if a character is suffering from more than one.
Esuna spell can also remove status ailments. This ability removes only the most recently inflicted ailment, so it must be used repeatedly if a character is suffering from more than one.
There are also a small number of special status alterations, such as the following:
(A) Doom: When a character is inflicted with this status, a countdown begins. When the count reaches zero, the character is KO’d. There is no way to stop the effects of Doom, but certain accessories grant resistance to the instant KO caused by Death and similar abilities.
(B) Dispel: Removes the most recent status enhancement from the target.
Status effects can be neutralized by applying the opposite effect, which effectively cancels out both. This enables a Synergist to remove status ailments in place of a Medic, and also allows a Saboteur to remove status enhancements from enemies.
(A) ![]() Debrave cancels
Debrave cancels ![]() Bravery.
Bravery.
(B) Defaith cancels ![]() Faith.
Faith.
(C) ![]() Deprotect cancels
Deprotect cancels ![]() Protect.
Protect.
(D) ![]() Deshell cancels
Deshell cancels ![]() Shell.
Shell.
(E) ![]() Slow cancels
Slow cancels ![]() Haste.
Haste.
(F) ![]() Curse cancels
Curse cancels ![]() Vigilance.
Vigilance.
(G) ![]() Imperil cannot be canceled.
Imperil cannot be canceled.
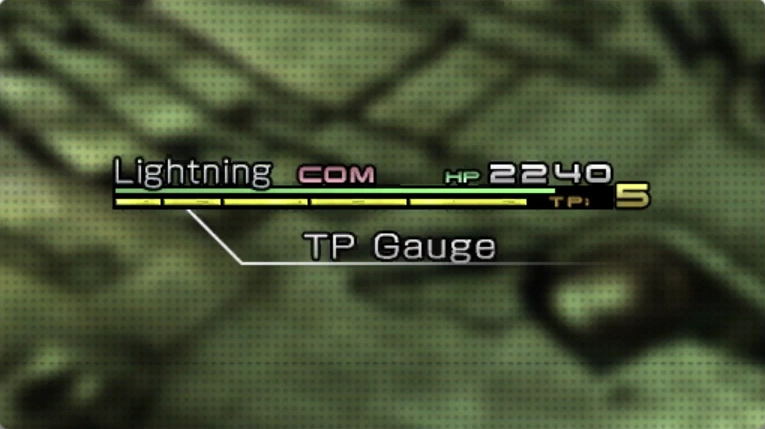
Techniques are special abilities you can perform by spending technical points (TP). They do not require any ATB gauge expenditure.
You can perform techniques in battle by selecting the Techniques command and then choosing the desired ability. To replenish your TP supply, unleash successful ability queues or earn high ratings after battle. Certain items also restore TP.
Libra reveals vital information about your enemies. After revealing enemy weaknesses with this technique, your allies will do their best to take advantage of this intel when deciding their actions.
To view the information you have gathered on enemies, press ![]()
![]()
![]() during battle, or press
during battle, or press ![]()
![]()
![]() to open the main menu outside of battle and then select Datalog followed by Enemy Intel. A check mark icon (✓) will be shown by the name of any enemy whose attributes you have fully discerned.
to open the main menu outside of battle and then select Datalog followed by Enemy Intel. A check mark icon (✓) will be shown by the name of any enemy whose attributes you have fully discerned.
Using Libra does not change enemy strengths or weaknesses. Even if you do not know an enemy’s elemental vulnerabilities, using attacks of those elements will be just as effective.
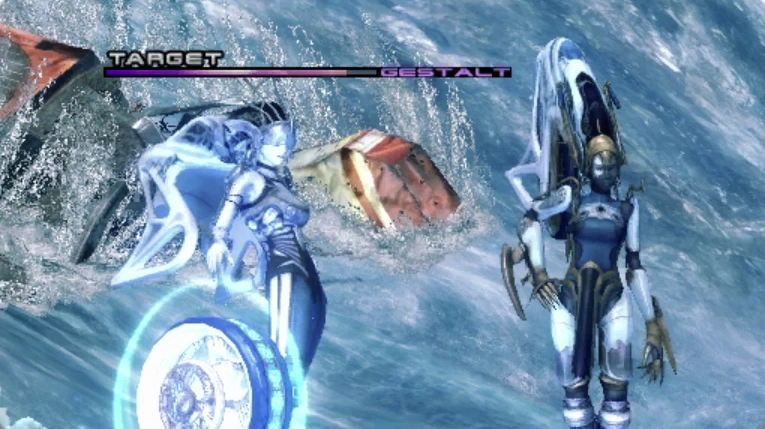
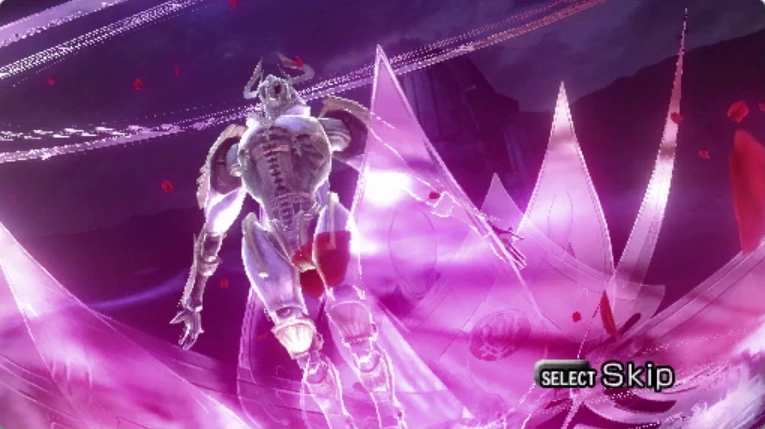
When battling Eidolons, it is possible to deal damage to them as you would to any other enemy. However, this alone will not end the battle.
As you attack Eidolons, a special gauge fills. When this gauge becomes full, you must press ![]()
![]()
![]() to asset your dominance over the Eidolon and claim victory.
to asset your dominance over the Eidolon and claim victory.
Attacking is not the only way to charge the gauge. There are other methods, differing between Eidolons, which are just as effective. Experiment with a variety of abilities to see which work.
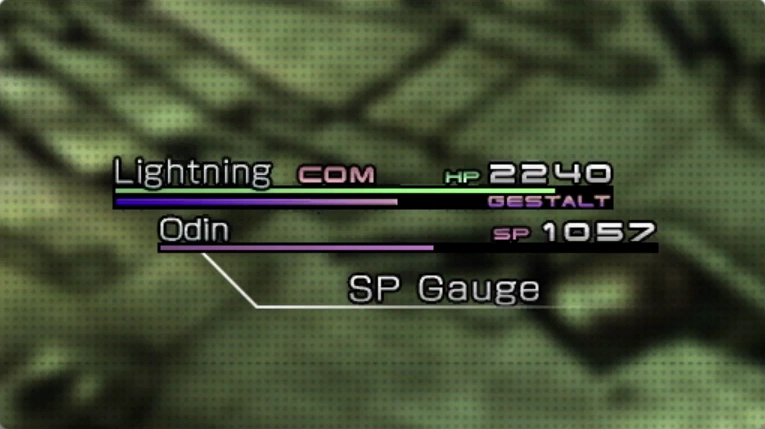
A character who has overcome the challenge of an Eidolon learns the Summon technique. Performing this technique calls the Eidolon to the summoner’s side, where it will attack enemies and restore HP to allies.
A summoned Eidolon will continue fighting for the party until its SP gauge is empty. The SP gauge drains slowly over time, and also whenever the Eidolon takes damage.

After summoning an Eidolon, you can press ![]()
![]()
![]() to activate gestalt mode at any time. The level of the Eidolon’s gestalt gauge determines how long you can remain in the mode.
to activate gestalt mode at any time. The level of the Eidolon’s gestalt gauge determines how long you can remain in the mode.
The gauge is charged by working with the Eidolon to build attack chains against enemies, so the longer you fight together before activating gestalt mode, the longer you will be able to maintain it.
In gestalt mode, you can perform various devastating attacks by pressing the buttons indicated on the screen. Alternatively, you can press ![]()
![]()
![]() to use Autogestalt, leaving the choice to your Eidolon. Each ability expends a certain number of time units, shown next to the ability’s name, thereby reducing the overall duration of gestalt mode.
to use Autogestalt, leaving the choice to your Eidolon. Each ability expends a certain number of time units, shown next to the ability’s name, thereby reducing the overall duration of gestalt mode.
Once time runs out, the Eidolon will be dismissed. Enemy chain gauges will be reset and staggered enemies will recover, but the Eidolon will restore your entire battle team’s HP and remove any status ailments from members before departing.
The animated scenes played during the summoning of Eidolons can be skipped at any time by pressing ![]()
![]()
![]() , as can the scenes shown upon activating gestalt mode.
, as can the scenes shown upon activating gestalt mode.
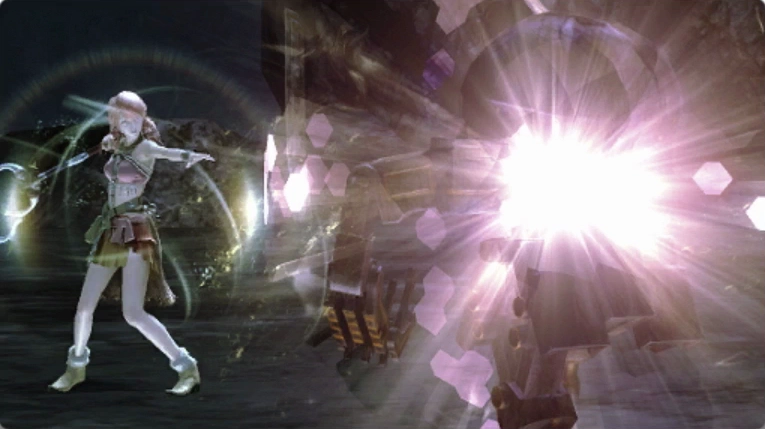
At times, you will encounter enemy groups engaged in battle with one another. With their attentions occupied, it becomes easier for you to initiate combat with a preemptive strike.
Coming into contact with a member of either side will initiate a battle against both. However, the enemies may not even notice your presence at first, continuing to fight one another instead. When this occurs, it is most effective to concentrate all of your attacks against the side you expect to have the most trouble defeating.
Once you have defeated the first group of enemies with help from their foes, you can turn and fight the already-weakened second faction. Pick your targets poorly, and you may be left waging a long and bitter battle against overwhelming odds.