
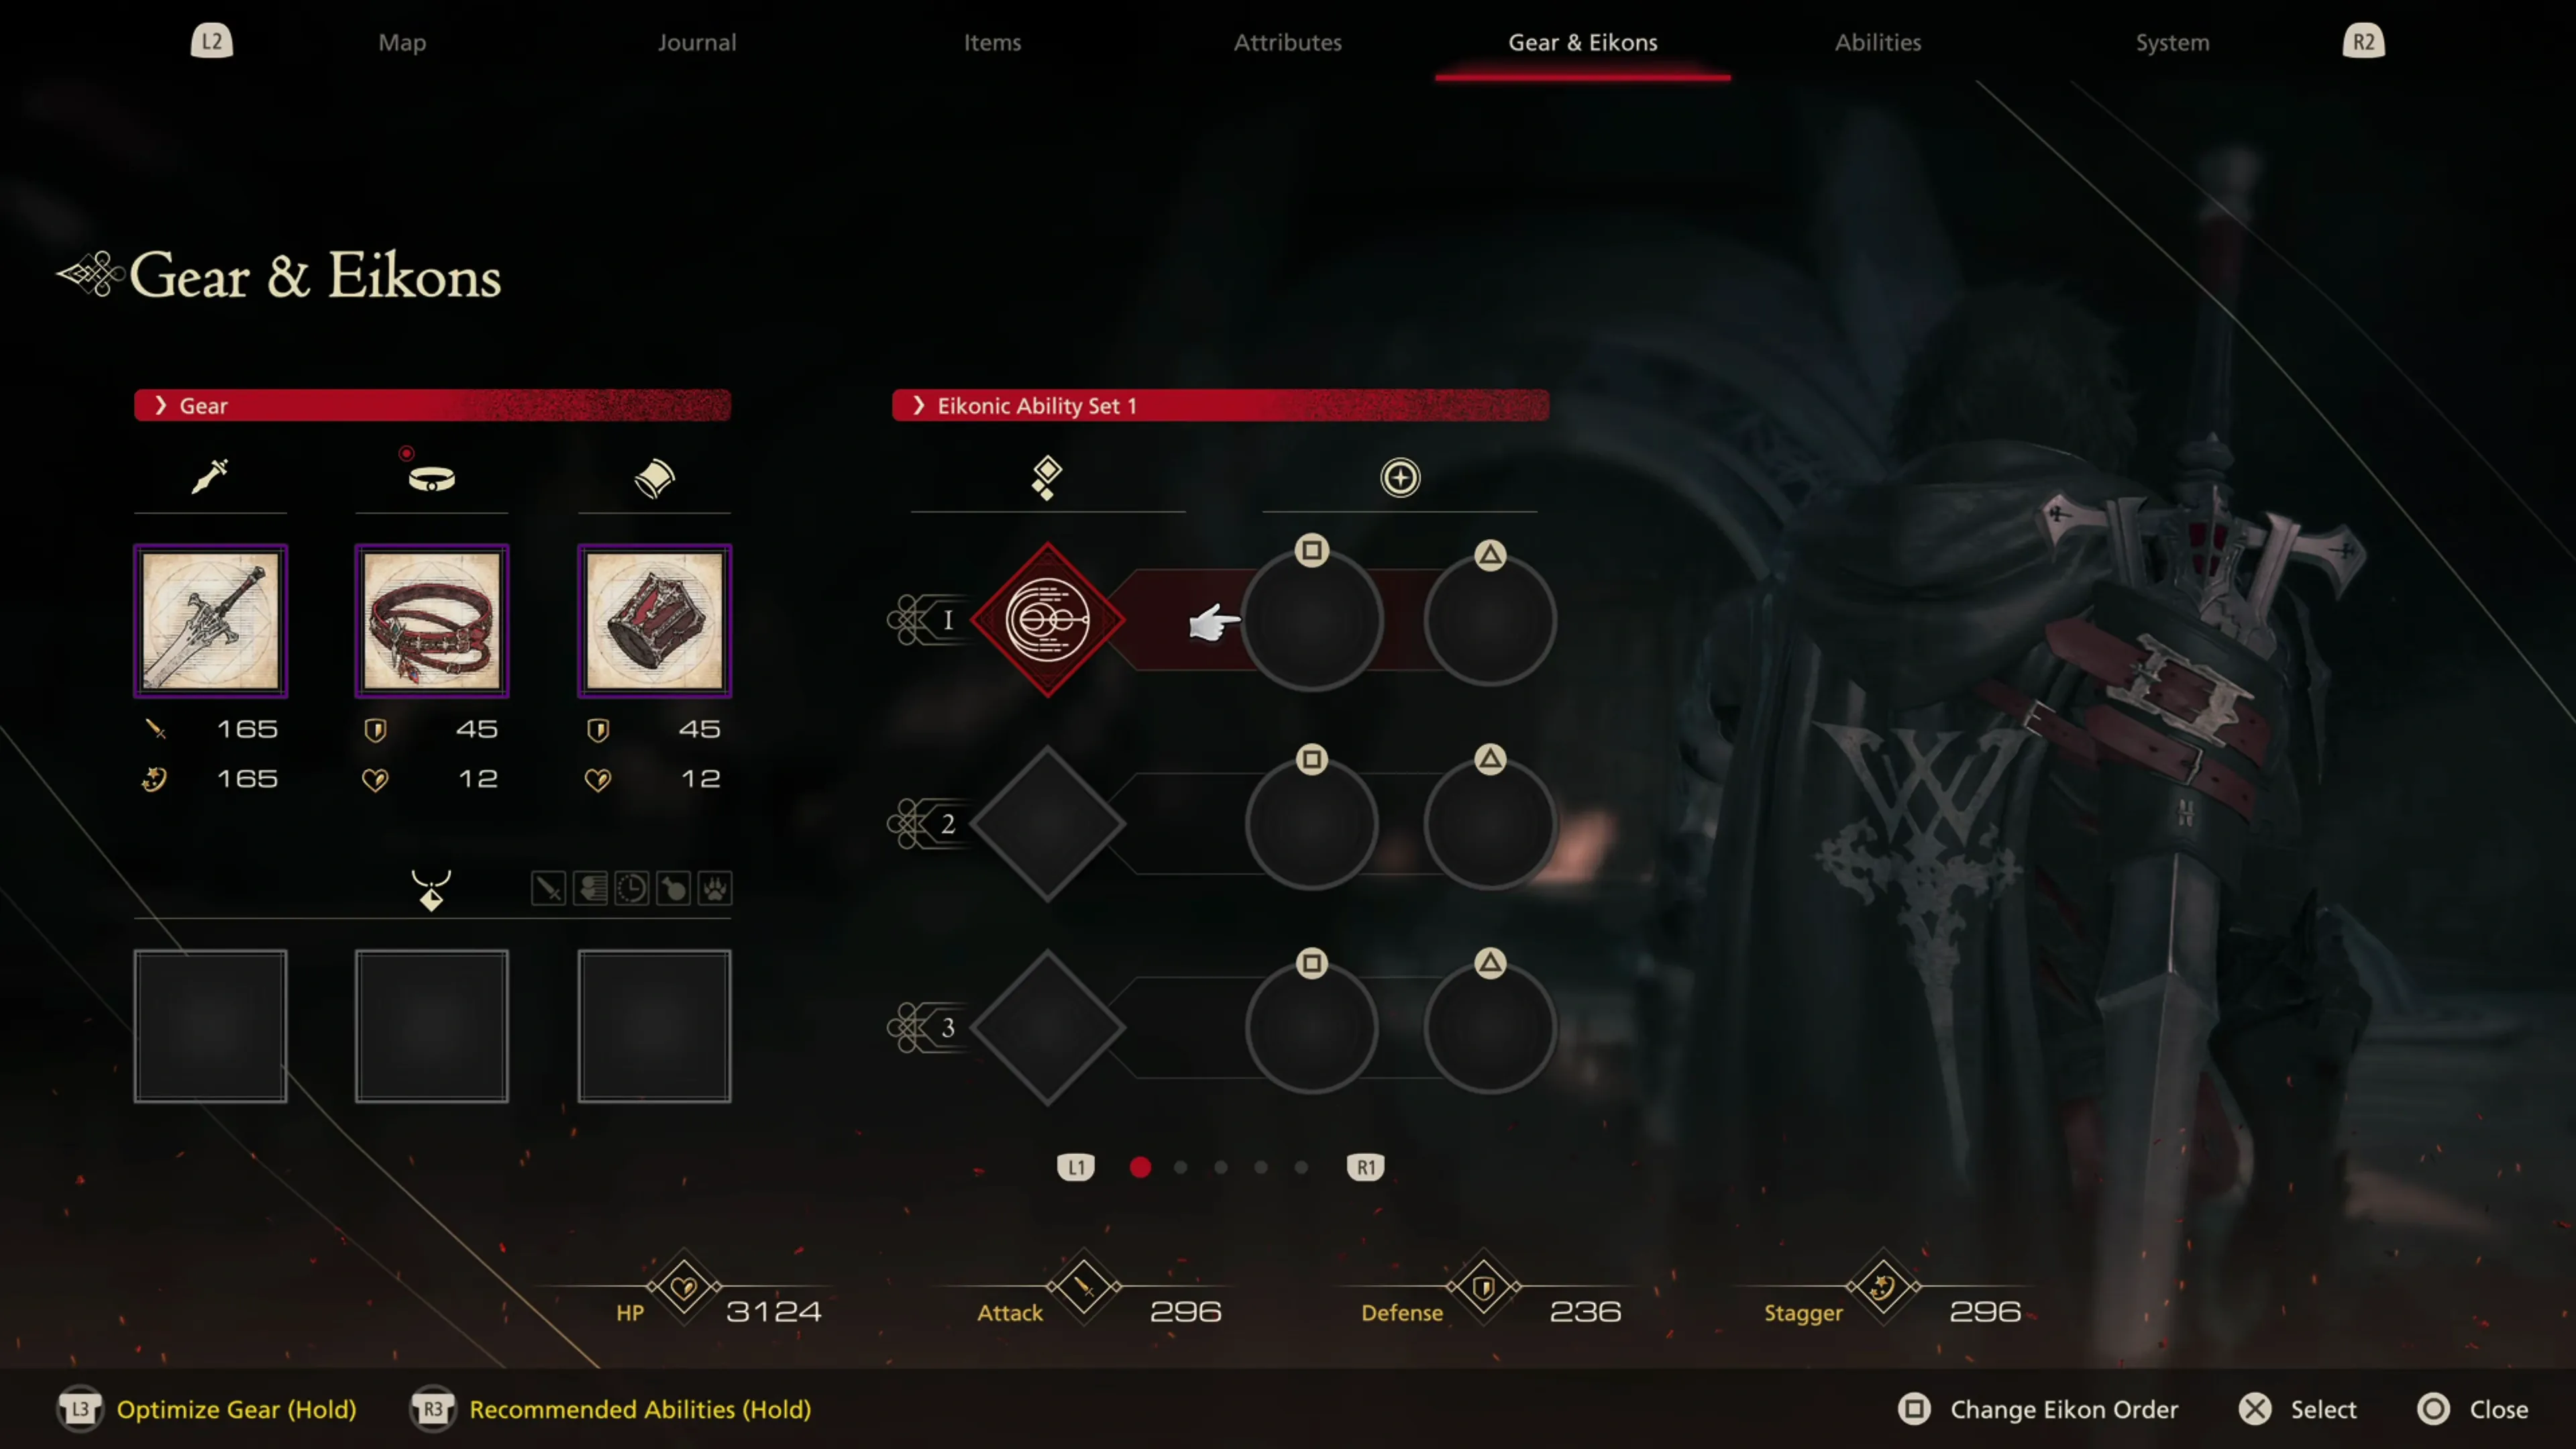
Eikonic Ability Sets
Clive will gain access to new Eikons and new Eikonic Abilities that you can configure to the ![]()
![]()
![]() +
+ ![]()
![]()
![]() and
and ![]()
![]()
![]() +
+ ![]()
![]()
![]() button combinations as you progress through the game. You first gain access to “Eikonic Ability Sets” during
button combinations as you progress through the game. You first gain access to “Eikonic Ability Sets” during ![]() A Chance Encounter, but at this point in the game, you’ll only have access to a single set for
A Chance Encounter, but at this point in the game, you’ll only have access to a single set for ![]() Phoenix, and you can’t customize anything.
Phoenix, and you can’t customize anything.
By the time you reach Chapter 6, you will be able to choose from different ![]() Eikons as well as abilities, and the levels of customization become nearly endless. However, for Chapters 1 through 5, you should consider setting up two different sets:
Eikons as well as abilities, and the levels of customization become nearly endless. However, for Chapters 1 through 5, you should consider setting up two different sets:
- One for single-target combat
- One for multi-target combat
Throughout this guide, you’ll see references to “Single-Target Eikonic Ability Set” and “Multiple-Target Eikonic Ability Set,” and the reason that these two set types are split into two categories is that many of the abilities that you’ll have access to are only suitable for one kind of fight or another.
For example, ![]() Rising Flames,
Rising Flames, ![]() Gouge, and
Gouge, and ![]() Rook’s Gambit are all excellent abilities to use during a boss fight, but they’re not great for clearing out large groups of enemies as you’re working your way through a dungeon. Other abilities, like
Rook’s Gambit are all excellent abilities to use during a boss fight, but they’re not great for clearing out large groups of enemies as you’re working your way through a dungeon. Other abilities, like ![]() Scarlet Cyclone,
Scarlet Cyclone, ![]() Wicked Wheel, or
Wicked Wheel, or ![]() Pile Drive, are much better for dealing with large groups.
Pile Drive, are much better for dealing with large groups.
Helpful Hint
Note that “Eikonic Ability Sets” doesn’t refer to using the ![]()
![]()
![]() button to cycle between Eikons (i.e., from say
button to cycle between Eikons (i.e., from say ![]() Garuda to
Garuda to ![]() Ramuh). Instead, these sets can be found under the “Gear & Eikons” tab of the main menu, and you can use the
Ramuh). Instead, these sets can be found under the “Gear & Eikons” tab of the main menu, and you can use the ![]()
![]()
![]() or
or ![]()
![]()
![]() buttons to cycle through up to 5 sets.
buttons to cycle through up to 5 sets.
Building Single vs. Multi-Target Sets
Many abilities are helpful for both single-target fights and multiple-target fights. For example, ![]() Heatwave can be used to reflect powerful boss spells, but the magic slash effect can also hit multiple targets at the same time. Another example would be
Heatwave can be used to reflect powerful boss spells, but the magic slash effect can also hit multiple targets at the same time. Another example would be ![]() Diamond Dust, which is excellent against large groups of enemies, but is also extremely useful for quickly depleting an enemy’s “Will Gauge.”
Diamond Dust, which is excellent against large groups of enemies, but is also extremely useful for quickly depleting an enemy’s “Will Gauge.”
You will quickly get a feel for which abilities are useful in which situations, but to help you out, here are some recommendations for the first few Chapters and the first few Eikons:
| Single Target Eikonic Abilities | Multiple Target Eikonic Abilities |
|---|---|
Mastering Abilities
It’s critical to note that, for Eikonic Feats and Eikonic Abilities, the purpose behind why you would spend points Mastering these abilities. The only additional benefit that mastering these abilities will provide is that it “allows assignment to any Eikon.” In other words, it allows you to select an Eikon and Eikonic Feat, like ![]() Phoenix, and assign Eikonic Abilities from other Eikons to it, such as
Phoenix, and assign Eikonic Abilities from other Eikons to it, such as ![]() Lightning Rod or
Lightning Rod or ![]() Gouge.
Gouge.
Important: If you are not assigning the ability to another Eikon, mastering these abilities provides no benefit and is a waste of ![]() Ability Points. You can reset these abilities at any time to recover your spent points by pressing
Ability Points. You can reset these abilities at any time to recover your spent points by pressing ![]()
![]()
![]() on the ability or pressing
on the ability or pressing ![]()
![]() to reset all abilities.
to reset all abilities.

Endgame Sets
Once you reach the end of the game, there will be significant overlap between single-target and multiple-target abilities, to the point where you may no longer need to have two separate sets of abilities and can keep the same Eikonic Abilities activated throughout the chapter. Here are some examples of abilities that make this easier to manage:
 Arm of Darkness: A fully charged Zantetsuken deals a ton of damage to a boss, but can also instantly kill large groups of enemies.
 Cold Snap: The permafrost effect applies to all targets on the battlefield if you successfully time your dodge.
 Diamond Dust: As mentioned above, this ability is great for ripping through a tough enemy’s “Will Gauge,” but it also deals heavy damage with a large area of effect.
 Gigaflare: This ability is better suited towards dealing heavy damage to a single target. However, if you manage to get all of your enemies lined up in a row, it can help deal with groups of enemies as well.
 Lightning Rod: This ability is great during a stagger but can also be used to clear out groups and waves of enemies.
This walkthrough and strategy guide will always list the times when it makes sense to swap between the two different ability set types, though, allowing you to decide as to whether or not you want to run more than one set.
Ability Progression
There is no question that the Eikonic abilities you gain access to later on in the game are much more powerful than the ones you receive at the start. But which abilities are worth keeping? And which abilities should you be looking to unlock as soon as possible? Let’s look at these two categories of abilities…
Keepers vs. Immediate Unlocks
The following abilities are ones that you obtain early on, and they continue to have utility as you progress through the game:
| Ability | Notes |
|---|---|
| This ability is powerful when you receive it early on in the game, and it continues to provide value from the start of the game through to the last battle. In addition to allowing you to block/reflect powerful ranged attacks from bosses, the damage dealt to the enemy, and the amount that it depletes that enemy’s “Will Gauge,” is significant. It provides strong offensive and defensive abilities that are tough to replace. | |
| These two abilities provide strong defensive utility that is also difficult to replace. “Flames of Rebirth” is one of the few abilities (in addition to |
|
| When an enemy’s “Will Gauge” reaches 50%, they will be briefly staggered. Using “Deadly Embrace” on an enemy while they are staggered will haul them to the ground and give you a brief window to deal damage. This effect continues from the moment you receive |
|
| These abilities all fit into the category of being so strong that you should go out of your way to make room for them as soon as possible. This section won’t provide another write-up discussing their utility, but click on the abilities in the column to the left or head to the Abilities section if you would like to read more about just how strong these abilities can be. |
The following abilities are ones that you should unlock and make use of as soon as you have the opportunity to:
| Ability | Notes |
|---|---|
| See the notes above. You should unlock these abilities as soon as possible on account of just how strong they are compared to other options. | |
| The strength of this ability cannot be overstated, but it is a new playstyle that takes a bit of getting used to. You’ll have to learn to dodge with |
|
| When you first receive it, the utility of Zantetsuken may seem questionable. Are you expected to attack enemies with a weak sword the entire time until the Zantetsuken gauge is fully charged? No, as there are tactics that you can use (such as utilizing |
|
| This ability can be challenging to work into a rotation until you’re intimately familiar with the game and how to time abilities during a stagger window. Check out the ability section by clicking on the ability link in the left column to learn more about how to use this in your rotation. |
That said, one of the strong points of Final Fantasy XVI is the level of customization available to players and the creativity that it offers. You can find all sorts of videos and player discussions about obscure and new ability combinations, so don’t be afraid to color outside the lines and try something that’s new or something that works for you.